การเซพ Screenshot ใน Unity3D by heha
Jul0
บทความนี้จะแนะนำการเซพ screenshot จาก Unity3D พร้อมส่งขึ้น Server เสร็จสรรพด้วย Code ด้านล่างนี้
using UnityEngine;

using System.Collections;

using System.IO;

public class HiResScreenShots : MonoBehaviour {

public int resWidth = 400;

public int resHeight = 400;

private bool takeHiResShot = false;

public static string ScreenShotName(int width, int height) {

return string.Format("{0}/screenshots/screen_{1}x{2}_{3}.png",

Application.dataPath,

width, height,

System.DateTime.Now.ToString("yyyy-MM-dd_HH-mm-ss"));

}

public void TakeHiResShot() {

takeHiResShot = true;

}

void LateUpdate() {

takeHiResShot |= Input.GetKeyDown("k");

if (takeHiResShot) {

StartCoroutine(take ());

}

}

IEnumerator take() {

RenderTexture rt = new RenderTexture(resWidth, resHeight, 24);

camera.targetTexture = rt;

Texture2D screenShot = new Texture2D(resWidth, resHeight, TextureFormat.ARGB32, false);

camera.Render();

RenderTexture.active = rt;

screenShot.ReadPixels(new Rect(0, 0, resWidth, resHeight), 0, 0);

camera.targetTexture = null;

RenderTexture.active = null; // JC: added to avoid errors

Destroy(rt);

byte[] bytes = screenShot.EncodeToPNG();

DestroyImmediate(screenShot);

string filename = ScreenShotName(resWidth, resHeight);

System.IO.File.WriteAllBytes(filename, bytes);

// Create a Web Form

var form = new WWWForm();

form.AddBinaryData("fileUpload",bytes);

// Upload to a cgi script

var w = new WWW("http://mywebsite.com/save_image.php", form);

yield return w;

Debug.Log (w.text);

Debug.Log(string.Format("Took screenshot to: {0}", filename));

takeHiResShot = false;

}

}

- Copy code ด้านบนไปสร้างไฟล์ชื่อ HiResSreenShots.cs แล้ว attach script ไปที่ camera ที่ต้องการจะเซพ screenshot โดยคุณสามารถ attach กับ main camera ถ้าต้องการเซพทั้งจอ หรือ attach กับ secondary camera เพื่อเซพภาพเฉพาะส่วน(ไม่ทั้งจอ) ที่ secondary camera มองเห็นได้
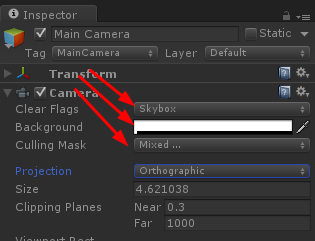
- Camera ที่ต้องการจะใช้งาน ต้องเซ็ตกล้อง Clear Flags เป็น Skybox และใส่ Background เป็นสีขาว (เมื่อ save screenshot แล้วสี background จะตามมาจางๆ ถ้าเป็น transparent ซึ่งตรงนี้ผมเองก็ยังไม่เข้าใจนัก) ไม่อย่างนั้นการเซพรูปหลายๆ ครั้งภาพเก่าจะไม่ถูกล้างไปจาก memory
- เลือก Culling Mask ของ Camera ให้เห็นเฉพาะ Layer ที่ต้องการจะเซพ screenshot
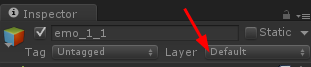
- เลือก GameObject ที่ต้องการจะเซพ screenshot แล้วเลือก Layer ใน Inspector เป็นอันเดียวกันกับข้อ 3
- ส่วนของ Res Width และ Res Height คือขนาดของรูปภาพที่จะเซพออกมา โดยอ้างอิงจากมุมมองของกล้องเป็นหลัก ซึ่งสามารถทดลองดูภาพที่จะเซพออกมาได้ด้วยการปรับขนาดจอที่หน้า Game ให้เท่ากับขนาด Res Width/Height
- สร้าง Directory screenshots ใน Assets เพื่อรองรับรูปที่จะเซพออกมา (หากไม่ต้องการเซพลงเครื่องให้ comment ส่วนของ System.IO.File.WriteAllBytes(filename, bytes); ออกไป)
- แก้ http://mywebsite.com/save_image.php เป็นเว็บที่จะเก็บรูป
- กด Play แล้วกด k เพื่อเซพ ระหว่างนั้นสามารถทดลองขยับกล้องเพื่อปรับภาพที่จะเซพได้
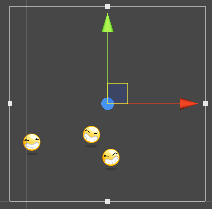
มุมมองกล้องที่จะเห็นหลังเซพ
เท่านี้เราก็จะได้รูป png ออกมาสวยงามครับ ![]()
Enjoy this article?
Consider subscribing to our RSS feed!
ไม่มีความเห็น
ยังไม่มีความเห็น
ใส่ความเห็น
Who are we?
